
Mini: Bloom
How to do a rich bloom effect

Hi readers,
Today, I want to talk about one of my favorite post-processing effects: Bloom.
Bloom is used to make elements appear brighter and richer. We’ll explore a simple, old-school method and a more modern richer method:

For comparison, here’s a cheaper type of bloom that was common in the late 2000s and early 2010s:

This tutorial will serve as a loose guide, to give you a few options and help you find a style for your game. The general process can be broken into 3 stages
1. Threshold
Here’s what happens when applying the bloom to the whole image:

So the left side shows the base image without bloom for comparison. This image looks way too washed out and hazy. This reminds me of when bloom was new and every game had too much of it! So for best results, we need to select only specific pixels that we want to appear bright and only bloom around them.
There are a couple of ways to do this:
Simply draw the elements you want to glow onto a bloom surface! This method is super easy and gives you full control of the glowing effect. Perfect for fire, projectiles, streetlamps, headlights, and anything else that glows. This is generally the method I recommend however there are other options.
Highlight pixels that are above a certain brightness threshold. This makes the process of selection completely manual which can be faster for development. It also makes silhouettes and object occlusion much simpler without having to subtract anything (or in 3D, deal with depth). It can automatically work with effects like reflections.
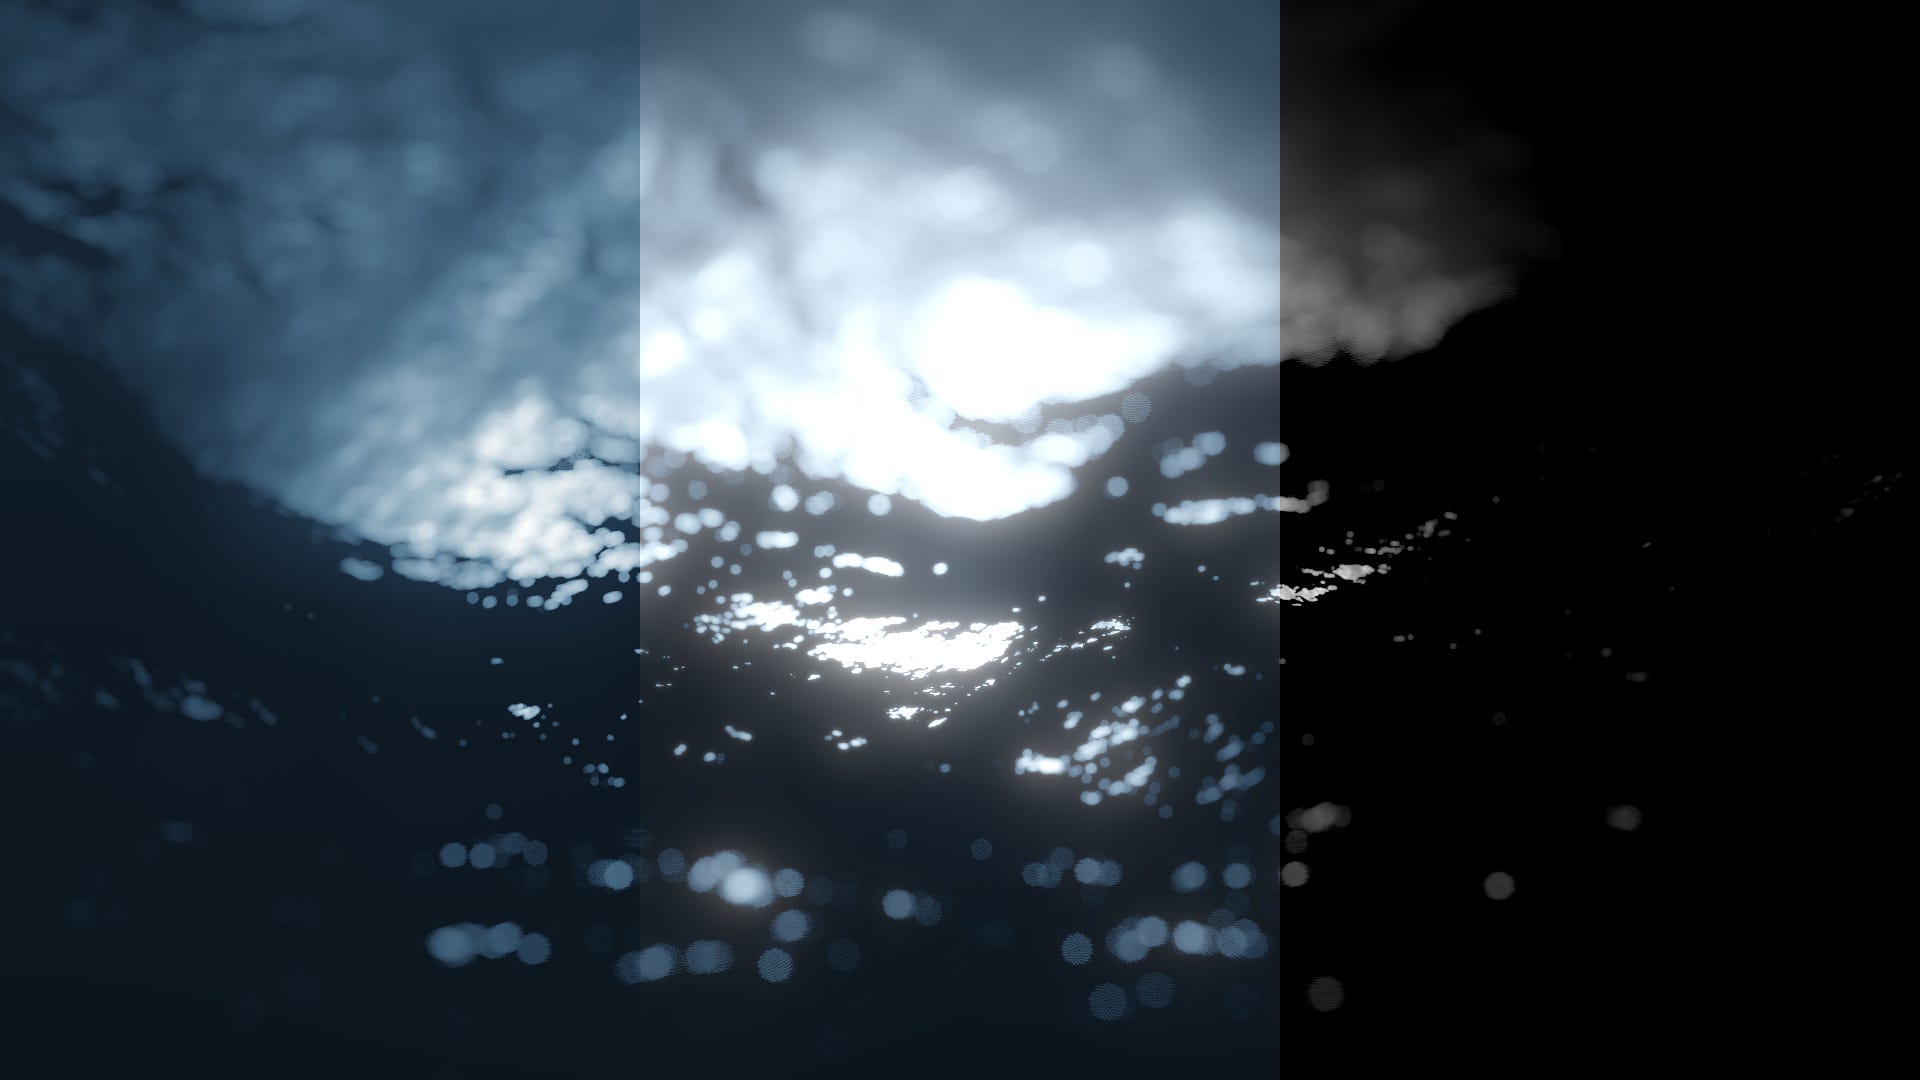
This can be done by computing the luma (grayscale value) and mapping it to a smaller range:float bloom = smoothstep(BLOOM_START, BLOOM_END, luma);So for example, if BLOOM_START = 0.6 and BLOOM_END = 0.8, then pixels with a luma value less than 0.6 will not contribute to the bloom, a luma value of 0.7 will contribute 50%, and a luma value greater than 0.8 will have full intensity. Here’s an illustration:
Left is the original, middle is the bloom, right is the bloom intensity
So now that we selected which pixels should glow, now let’s actually write the glowing part!
2. Blur
At its core, every glow effect has a blur inside:

By just adding a Gaussian blur to an image, it can instantly give you the impression of illumination.
This presents us with two new challenges: performance and weight distributions.
Blur shaders deserve a full tutorial just for themselves, so I won’t cover them in detail here. For now, you can box blur will do (or read up on disk or Kawase blurs).
Doing a large blur can be quite slow because it requires sampling many, many texels and computing the average. The other issue is that Gaussian distribution doesn’t look right:

Gaussian blur has too much strength in the middle without the fine details of our large-scale shape. Thankfully there’s a relatively easy solution to both problems!
3. Layering
Since doing a large box blur is slow, it’s better to do it in multiple passes. One 5x5 blur is slower than two 3x3 blur passes! Not only that, but we can increase the sample spread with each pass to cover a larger area in fewer steps.
Here’s a quick box blur example:
vec4 blur_total = vec4(0);
for(int x = -1; x<=1; x++)
for(int y = -1; y<=1; y++)
{
	blur_total += texture2D(gm_BaseTexture, v_vTexcoord + vec2(x,y)*stepsize);
}
blur_total /= 25.0;
“stepsize” here is the size of the texel times the “pass” number. So the first pass has a one-texel spread, the second has a two-texel spread, and so on, as many passes as you need.
The best part about doing the blur incrementally is that you can draw blur pass additively and combine them all together! That’s how you solve the weight distribution problem at the same time! Since you’re using the add blend mode, you may need to reduce the brightness of the output. This can be done by drawing each pass surface with a darker color blend, but that’s up to you and your particular needs. For example, having earlier passes be stronger will produce a different look, so definitely play around with it and see what you like best.
Conclusion
So to summarize, bloom has three stages: threshold where you select which pixels to glow, blurring “glowing” pixels, and layering the blurred images with the original. It’s good to understand how distributions can affect the look of your glows so that you can make more informed design decisions! In some styles, gaussian may look best, but most of the time, this layered result produces richer results!
If you’re hungry for more, here’s a great video on the topic:
Also, you can read up on the super-fast Kawase blur algorithm for squeezing out some extra performance (Note: Dual-Kawase won’t work with this layering method).
Anyway, I hope you learned something new! Enjoy your weekend!