Mini: Common Formulas
Common math used in shader programming
Hi everyone,
Today is all about general mathematical tips and pointers that are super useful for shader programming. This topic was decided by the popular vote from my recent poll on Twitter/X. Let’s start with alpha blending.
Alpha Blending
Sometimes, inside your shader, you have to blend two things together. Maybe you have an overlay texture that you need to blend with the base texture, or anything else you need to blend together inside your shader.
To do this, we can just recreate GM’s normal blendmode in our shader:
I’ve written about blendmodes before, so I won’t go over the process again here, but if you want to read about it, you can do so:
I like to think of the source color as the “top” and the destination as the “bottom”.
So the we end up with “bottom*(1.0-top.a) + top*top.a”. This does the same thing as mix, so I’ll write it like so.
vec4 blend_alpha(vec4 bottom, vec4 top)
{
    return mix(bottom, top, top.a);
}
This is fine for handling the color, but it does some strange things with the alpha. For example if you have an opaque background (alpha = 1.0) and a linear gradient, the result is actually not opaque!
This is because the alpha is mixed in the same way as the color. Suppose you have a white opaque bottom color: vec4(1.0, 1.0, 1.0, 1.0) and a black 0.5 alpha top color: vec4(0.0, 0.0, 0.0, 0.5). You actually get vec4(0.5, 0.5, 0.5, 0.75)!
Why? Because 1.0*(1.0-0.5) + 0.5*0.5 = 0.75. It’s the mixture of the top and bottom alphas. This doesn’t make a lot of sense conceptually, that an opaque color + a transparent color = a transparent color?
Instead, we mix toward the sum of the two alphas like so:
vec4 blend_alpha(vec4 bottom, vec4 top)
{
    //Add the top and bottom alpha <= 1.0
    float sum = min(top.a+bottom.a, 1.0);
    //Blend color and alpha sum
    return mix(bottom, vec4(top.rgb, sum), top.a);
}
This produces more reasonable results and is the way that programs like GIMP blend alpha.
Weighted Averages
There are many times where computing averages is useful. We do so to blur images, by sampling many points and averaging the colors. In case you’re rusty, here’s how you compute the average of “a”, “b” and “c”:
//Number of elements
float num = 3.0
//The sum total of all elements
float total = a+b+c;
//Compute the element average
float average = total / num;
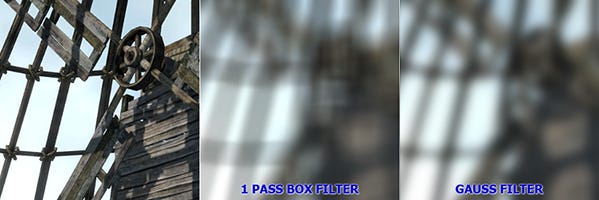
If you’ve ever written a box blur shader before, you know how it doesn’t always produce the prettiest results, but the good news, is it’s not hard to make it look much better. Here’s an illustration from Intel:

The only difference between a Gaussian blur and a box blur is how the average is computed. Instead of all the samples having the same weight, you actually give each element it’s own weight. With Gaussian distribution, samples toward the center sample, have more weight and the samples near the edges have less weight.
Weighted averages can be used all over the place though. For example I like to use them with fractal noise, by giving each of layer a different weight depending on it’s scale. I also used it for chromatic aberration, giving sample a unique RGB weight.
When you look for it, you’ll find it everywhere, so how is it calculated?
Well, you need to add up the total of the weights as well as the sum of the elements multiplied by their respective weights. Then you can divide the sum total by the weight total. Here’s an example with 3 weights (x,y,z) and 3 elements (a,b,c).
float weight_total = x + y + z;
float sum_total = x*a + y*b + z*c;
float average = sum_total / weight_total;
You can imagine, in practice it could be used in a for-loop like so:
//Totals for computing weighted average
float weight_total = 0.0;
float sum_total = 0.0;
const float num = 10.0;

//Loop through "num" elements
for(float i = 1.0; i<=num; i++)
{
    //Sine waves for example
    float element = sin(gl_FragCoord.x/i);
    //Give each sample increasing weight
    float weight = i;

    //Sum up the totals
    weight_total += weight;
    sum_total += element * weight;
}
//Compute final weighted average
float average = sum_total / weight_total;
Perspective
Have you ever wanted to go from this:
To this?
You don’t have to learn raytracing if you don’t want to. The first step is to get the screen pixel coordinates centered on the middle of the screen (so subtract half the screen resolution).
//Pixel coordinates centered in the middle of the screen
vec2 pos = gl_FragCoord.xy - u_resolution*0.5;
Then you can turn these back coordinates into uv coordinates by dividing it by the screen resolution and adding 0.5, but doing it this way allows you to correct for the aspect ratio. If you divide both axes of pos by screen height, it will fit the screen vertically. Or you can divide by the screen width which fills the screen vertically, but may crop some of the uv values. I don’t mind the uvs repeating so I’ll use the screen height for this example.
Next, instead of dividing all the pixels by the same scale, you can actually add/subtract the “pos” y value to give a gradient of scale vertically!
//Perspective ratio (0.0 = no perspective)
float ratio = 1.0;

//Compute uv coordinates with perspective ratio
vec2 uv = pos / (u_resolution.y - pos.y * ratio) + 0.5;
This creates a sense of depth without any crazy advanced math and it leaves plenty of room for variations. You can even use the x axes for a vertical wall, or any axis you want with dot product. Hopefully you can get creative with this and use it in your shaders. Try my ShaderToy Demo!
Conclusion
To recap, alpha blending can be a little bit weird, at-least with the alpha channels. You probably don’t want to blend alpha the same way you do with color. I’ve personally used this with some of my volumetric shaders, when I need to blend many layers of clouds or fog together without messing up the alpha behind it.
Weighted averages give you much greater control when you need to combine a bunch of elements together. It’s a fairly simple trick to understand, but it’s uses are everywhere from blur shaders, chromatic aberration, noise shaders and many more places. 3D perspective can get super complicated, when you’re doing when dealing with ray origins, ray directions and occlusion, but if you want a simple 3D perspective effect, you don’t need all of that. All you need is to scale the image with a linear gradient. It’s a simple but powerful effect and one of my favorites.

My original plan was to include many more math topics, but it ended up branching far beyond the scope of a mini tutorial. I’d like to continue this journey over the coming weeks with many miscellaneous math things I’ve encountered over the years.
If you’re interested in this sort of stuff, please consider subscribing! If you’re able to support my work, it’s greatly appreciated, but I chose to make it freely available for anyone who cannot. Thanks for reading regardless!
Extras
BBMOD is a powerful 3D rendering solution for GameMaker, with many must-have features including model/animation loading, PBR rendering, lights and shadows, deferred and forward rendering and so much more!
Here’s a fun video by Acerola on using Fast Fourier Transforms for simulating an ocean.
That’s all for tonight. Take care!
-Xor


