Mini: Tonemaps
How to conquer washed out lights and ugly color banding
Good day.
One of the first things you learn about shaders is that color values range from 0.0 to 1.0. This is known as 8-bit “unorm” color, because each channel has 256 color values, is unsigned (meaning no negatives) and normalized to the 0.0 to 1.0 range. Most of the time, we don’t need to think about this because 8-bits is enough for outputting colors to the screen. Sometimes, blending 8-bit colors is just not enough though. Today I want to show demonstration when you should care and what to do about it.
Here’s an exaggerated 6-bit version to show how much of a difference this can make:
Before I write my tutorials, I usually do a quick Google search to see what resources already exist so that I can focus my efforts where they are most needed. “Tonemapping” has quite a few tutorials already, but they don’t seem to fit well in a GM context. My tutorial on the new surface formats are particularly relevant here!
GM Shaders Mini: Formats
Hello folks! It’s been a while, but I’m back! GameMaker recently added new “surface formats”. If you’re wondering what this is, you’ve come to the right place. Today, I want to cover what all this means and how you can use it! Formats Until now, GM has only supported one texture format: RGBA8unorm.
I’ll make some references to these surface formats today so make sure you’re familiar with the topic. Let’s go!
Overexposure
Imagine you have a sun shader. Something like this:
//Set the sun color.
vec3 sun_color = vec3(1.0, 0.5, 0.2);

//Set the brightness as the inverse of the distance to the center.
//Assuming v_vTexcoord ranges from 0 to 1.
float brightness = 1.0 / length(v_vTexcoord - 0.5);

//Output the resulting color.
gl_FragColor = vec4(sun_color * brightness, 1.0);
We know that v_vTexcoord-0.5 ranges from -0.5 to +0.5. Thanks to Pythagoras, we know that the length can return a value between 0 and sqrt(0.5). Since we’re computing the reciprocal, we’ll get a value between 1.0/sqrt(0.5) (around 1.4) all the way up to infinity. Technically, we should make sure we don’t divide by zero here by clamping or adding to the divisor, but I won’t worry about that here since a texcoord value of exactly (0.5, 0.5) is unlikely.
Since we started with a red value of 1.0 multiplying it by our brightness value will only make it brighter, but the shader output will just clamp it at 1.0. The green channel starts at 0.5, so multiplying by the brightness factor means we’ll get value range of around 0.7 up to infinity and the blue channel starts at around 0.28, all the way up to infinity. This means each channel hits their max brightness at different times, which changes the ratio and tint of the colors. Here’s what that looks like:
Notice how it goes from orange to yellow rather suddenly? This is because green hits it’s maximum value and can no longer get brighter in proportion to the other colors.
Oranges and yellows at least look somewhat natural together due to color temperature though. Other sun colors produce even more jarring results!
What if we more smoothly approach maximum brightness for each channel? That would help it maintain some color accuracy while still approaching white. Enter tonemapping!
Tonemaps
Here’s the same sun shader, but using a smooth tonemap function.
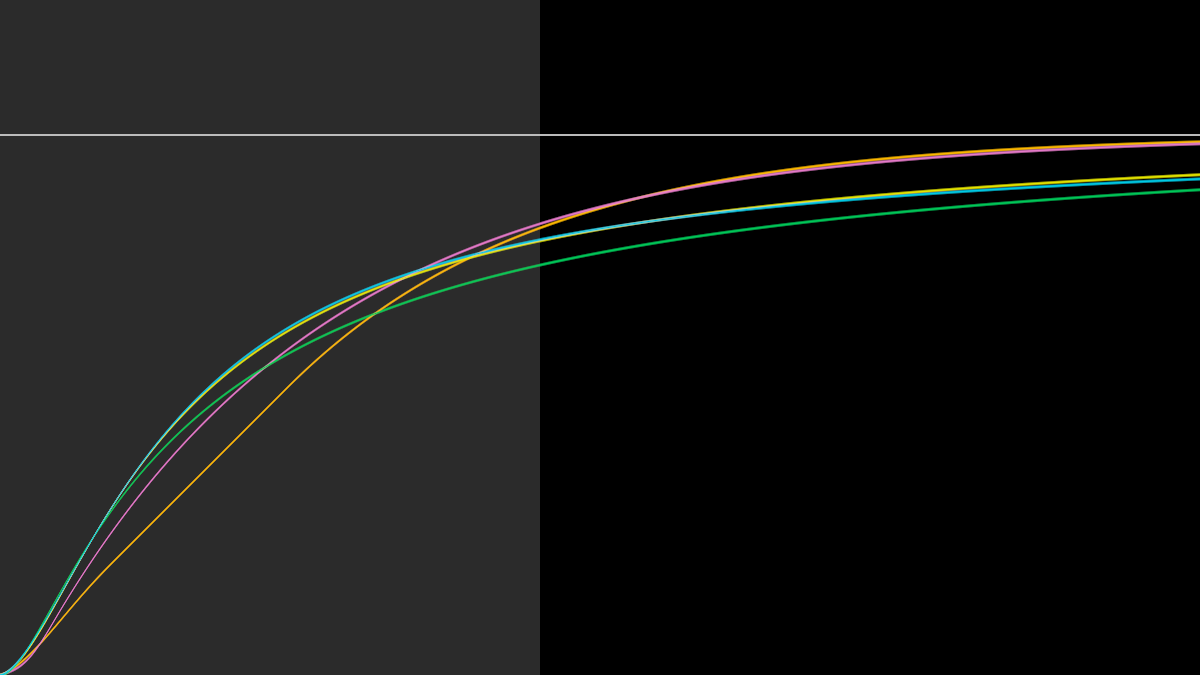
Here’s the graph of several common tonemap functions, where the x-axis is the input brightness and y-axis is the output brightness:

The white line shows us the maximum output brightness of 1.0 and the gray region is where the inputs range from 0 to 1. The clamped tonemap we used earlier is just a straight line from the bottom-left corner to the top-right of the gray square. It’s the clamping that makes it look unnatural. Our eyes are very good at noticing changes in brightness and when those changes suddenly stop.
So here are 3 common ones worth looking at:
ACES
// Narkowicz 2015, "ACES Filmic Tone Mapping Curve"
vec3 Tonemap_ACES(vec3 x)
{
    const float a = 2.51;
    const float b = 0.03;
    const float c = 2.43;
    const float d = 0.59;
    const float e = 0.14;
    return (x * (a * x + b)) / (x * (c * x + d) + e);
}
This one has a stronger curve with sharp colors and less brightness.
Hable
// Hable 2010, "Filmic Tonemapping Operators"
vec3 Tonemap_Uncharted2(vec3 x)
{
    x *= 16.0;
    const float A = 0.15;
    const float B = 0.50;
    const float C = 0.10;
    const float D = 0.20;
    const float E = 0.02;
    const float F = 0.30;

    return ((x*(A*x+C*B)+D*E)/(x*(A*x+B)+D*F))-E/F;
}
This is a softer curve, smoothly blending to white.
Unreal
vec3 Tonemap_Unreal(vec3 x)
{
    // Unreal 3, Documentation: "Color Grading"
    // Adapted to be close to Tonemap_ACES, with similar range
    // Gamma 2.2 correction is baked in, don't use with sRGB conversion!
    return x / (x + 0.155) * 1.019;
}
This is the brightest and smoothest of this set.
Bonus: Tanh
As a I also found that tanh(x) works good for a quick solution, but since GM’s GLSL doesn’t natively support it yet, you have to recreate it yourself:
vec3 Tonemap_tanh(vec3 x)
{
    x = clamp(x, -40.0, 40.0);
    vec3 exp_neg_2x = exp(-2.0 * x);
    return -1.0 + 2.0 / (1.0 + exp_neg_2x)
}
This is quite similar to ACES with darker, stronger colors.
HDR Rendering
“High-Dynamic Range” means having colors beyond the 0 to 1 range. Some post-processing effects can do the HDR stuff in one pass, and use tonemapping to convert back to 0 to 1 range (sometimes referred to as “Low-Dynamic Range”). That’s true of our sun shader example earlier. Other shaders may require multiple passes, like with large scale bloom or deferred rendering. In these cases, we require surface_rgba16float or surface_rgba32float (rarely needed) to store our HDR color. For a real example, I needed HDR surfaces for my lighting system in MandelBots.
I originally used LDR color for the lighting, but it suffered from washing out and ugly color changes. See how the green turns cyan near the sparks? In the end, I draw all the lights additively on a surface and then did tonemapping on the final results to bring the colors back to a reasonable range. I’m nearing my size limit for this email, so if you’re curious, you’ll have to follow the MandelBots link above to see more.
Conclusion
No one likes overexposed lighting and washed out colors. Thankfully there is a variety of options on how to solve it. Often times, it can be as simple as tonemapping the results of your shader before they reach the pixels on your screen. In other cases, you can use HDR surfaces to render colors more accurately and blend with higher precision. For example, if you’re combining a bunch of lights onto a surface, each pass is going to be limited to the quality of your surface, and sometimes 8-bit is just not enough. Hopefully this gave you some insights into the problems and how to solve these problems yourself!
Extras
Need Photoshop blendmodes in GameMaker? Check out DragoniteSpam’s GitHub example!
Yaazarai (formerly FatalSleep) built an impressive 2D global illumination system in GameMaker. Read his tutorial about it here!
That’s all for this week. Hope you have a great day!
-Xor


Great stuff! Maybe one day you could do a tutorial breaking down the way IQ is doing shading, his lighting algorithms seem very cryptic to me.
Great article!