Shadowmaps
An introduction to 3D shadows
Hey people,
It’s been too long. Today we are finally getting to some 3D stuff. I’ve been working towards 3D volumetric shadows, but before can get to that, let’s make sure you understand shadow mapping first. It’s probably the most widely used 3D effects and is a good place to start before going into more advanced effects. There are many tutorials out there, but I couldn’t find many for GameMaker, and they tend to overcomplicate. Hopefully this tutorial will make it easier to approach, whether you use GM or don’t.
Shadow mapping is still the most common way of doing shadows (especially when raytracing is not an option) and it’s relatively easy to learn.

Because it’s such an established effect, there are many variants and techniques that can be used to improve the effect. Today, we’ll go over the basics of hard shadows and soft shadows, and I’ll link some extra resources for further reading at the end.
I’m going to assume you already know the difference between world space, view space and projection space to save time, but if you don’t, you can read about them here
Depth Maps
The first thing we need is a depth map. This can be as simple as adding a varying float in the vertex shader, to pass the projection space depth to the fragment shader:
//Send the depth from vertex to fragment shader
//Add to both shaders (outside of the main function)
varying float v_depth;
And in vertex shader main(), set it like so:
//Set the projection depth (ranges from 0 (near plane) to 1 (far plane))
v_depth = gl_Position.z;
In the fragment shader, you just need to output this depth:
gl_FragColor = vec4(v_depth, 0, 0, 1);I greatly reduced the far clipping plane to increase the contrast, but if you test it on a 3D scene, you should get something like this:
This is what our light sources will “see”. We can then project this texture onto the world and any pixels, which are further than the projected depth, will be in shadow.
Now we need to draw this to a “shadow map” surface. We only need one 32-bit float channel, so use “surface_r32float”. This way, we can enable texture interpolation on the depth map to get smoother approximations of depth. If you’re using an old version of GameMaker which doesn’t support formats, you’ll need to use bit-packing instead.
Here’s my set-up, in the Pre-Draw Event, before anything is drawn, I make sure the surface exists and if not, we need to create and update the shadow map.
if !surface_exists(sha_surface)
{
    //Create shadow map (1 channel, 32 bit float)
    sha_surface = surface_create(sha_res, sha_res, surface_r32float);

    //Update shadow map first
    shadow_update();
}
To update the shadows, we need to draw everything that should cast shadows to the shadow map using the light source view and projection matrices (set accordingly). This works with perspective or orthographic projections! Here’s what my updating the shadow map looks like this:
function shadow_update()
{
    //Disable alpha blending (which messes up the data)
    gpu_set_blendenable(false);
    //Draw to the depth surface
    surface_set_target(sha_surface);
    //Clear the surface
    draw_clear(-1);
    //Set matrices
    matrix_set(matrix_view, sha_mat_view);
    matrix_set(matrix_projection, sha_mat_proj);
    //Apply depthmap shader
    shader_set(shd_depth);

    //Draw any models that you want to cast shadows
    vertex_submit(model, pr_trianglelist, texture);

    //Reset
    shader_reset();
    surface_reset_target();
    gpu_set_blendenable(true);
}
We only have to call this if the light source moves or if any of the shadow casters move, so not necessarily every frame! That’s it for the depth shader, now let’s actually use this!
Hard Shadows
To start the shadow shader, we’ll need to pass in the shadow map and the light source view and projection matrices as uniforms. In the vertex shader, we want to calculate the coordinates from the light source or shadow map’s view, and we can do that with our shadow view matrix, “u_sha_view” in my case. Here’s the simplified vertex shader:
//Other varyings
varying vec4 v_shadow;

//Shadow view matrix
uniform mat4 u_sha_view;

void main()
{
    gl_Position = gm_Matrices[MATRIX_WORLD_VIEW_PROJECTION] * vec4(in_Position, 1);

    //Shadow view coordinates with world transformations factored in
    v_shadow = u_sha_view * gm_Matrices[MATRIX_WORLD] * vec4(in_Position, 1);
    //Set, other varyings here
}
In the fragment shader, we need the shadow map texture and the shadow map projection matrix (you could do the projection matrix multiplication in the vertex shader, but having them separated is useful later). Here’s a super simple shadow fragment to test it with:
//Shadow view coordinates
varying vec4 v_shadow;

//Shadow map texture
uniform sampler2D u_sha_map;
//Shadow projection
uniform mat4 u_sha_proj;

//A small bias to minimize shadow artifacts
//The value may need to be adjusted depending on projection parameters
#define BIAS 0.001

void main()
{
    //Get shadow projection space
    vec4 p = u_sha_proj * v_shadow;
    //Projection uvs (0 to 1 with y-flipped)
    vec2 uv = p.xy / p.w * vec2(0.5,-0.5) + 0.5;

    //If the shadow map sample is further than the current depth
    //we're in the light, otherwise we're in shadow.
    vec3 shadow = vec3(texture2D(u_sha_map, uv).r+BIAS > p.z);
    //Output shadow as black or white.
    gl_FragColor = vec4(shadow, 1);
}
We multiply the projection matrix by the shadow coordinates to get our shadow projection space. This is useful because we know that once we correct for perspective (by dividing by the w component), the coordinates range from -1 to +1. If we multiply that by 0.5 and add 0.5 our new coordinates will range from 0 to 1, but we also need to flip the y-axis (because no one agrees on a standard).
Bias
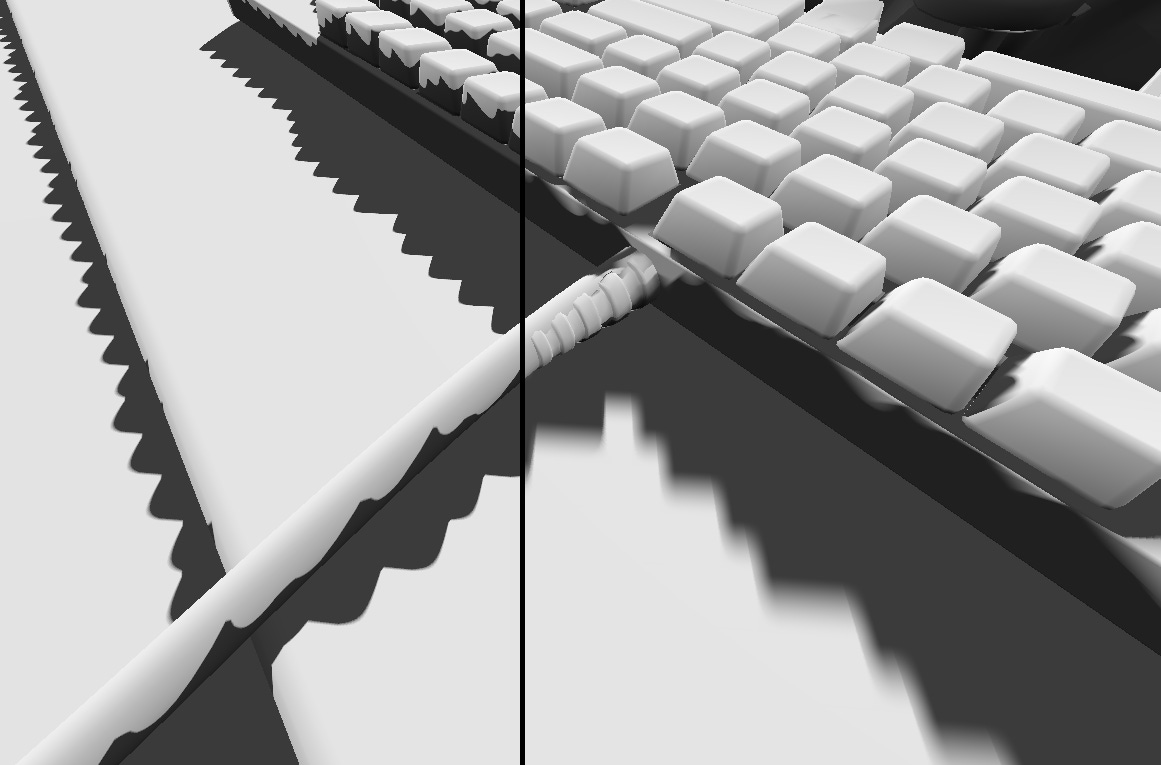
Next, we can sample the shadow map to see if the current fragment is further than the projected depth. The projected depth can be off a bit from many factors including shadow map resolution, depth precision, interpolation and projection. If we don’t add a bias, we’re basically causing z-fighting to happen everywhere, and it looks like this:
Bias can vary depending on projection matrices and scale, but I recommend starting with something like 0.001 and adjust it higher if there are tons of artifacts and lower if your shadows too distant from their source.
I’ve found that fading between the two states looks much better:
It even can create a slight illusion of soft shadows in some places with only one sample. Here’s the function, with the input “p” being the shadow projection coordinates:
//Shadow fading rate (higher = sharper, lower = softer)
//This is the reciprocal of a regular bias (1 / shadow_bias)
#define FADE 2e3

float shadow_hard(vec4 p)
{
    //Project shadow map uvs (y-flipped)
    vec2 uv = p.xy / p.w * vec2(0.5,-0.5) + 0.5;
    //Difference in shadow map and current depth
    float dif = (texture2D(u_sha_map, uv).r - p.z) / p.w;

    //Map to the 0 to 1 range
    return clamp(dif * FADE + 2.0, 0.0, 1.0);
}
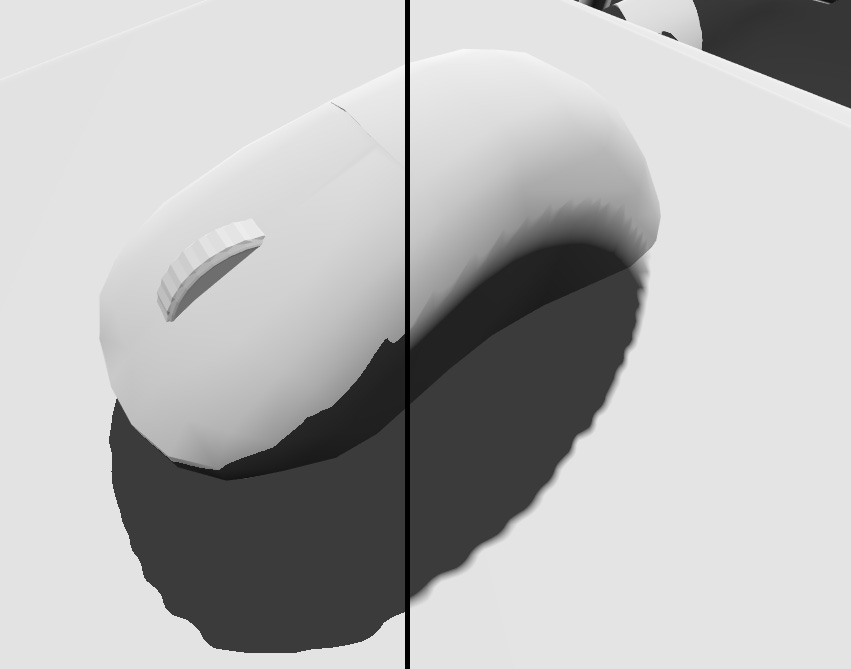
This method is far from perfect, though. When the light hits at just the wrong angle, it can create jagged edges and looks unnatural.
Even the sun, at its great distance, has enough area to cast soft shadows. We’ll have to look at some cost-effective methods for soft shadows, but first we to handle the edge cases. What should happen when you sample outside the shadow map?
Edges
I have texture repeat on, so I get weird shadows from nonexistent objects:
My preferred method is to apply a sort of vignette edge to the light, like it’s a spotlight. This can easily be done when you normalize the projection coordinates to the -1 to +1 range. Also, as long as the z coordinate is greater than 0, then we’re in front of the light, but negative values are behind the light, so you don’t want those lit either. I like to start by computing a shadow factor which starts at 1.0 and reaches 0.0 at the edges of the shadow map. If you do this first, you can multiply your shadow map result with this factor, but you only have to do so if you’re actually in the light (shadow > 0.0 or a low cutoff).
//Normalize to the -1 to +1 range (accounting for perspective)
vec2 suv = proj.xy/proj.w;

//Edge vignette from shadow uvs
vec2 edge = max(1.0 - suv*suv, 0.0);

//Shade anything outside of the shadow map
float shadow = edge.x * edge.y * float(proj.z>0.0);

//Only do shadow mapping inside the shadow map
if (shadow>0.01) shadow *= shadow_hard(proj);
Another option is to have the shadows fade out. This works better for outdoor settings. The process is the same, but inverted. Okay, now to soft shadows!
Soft Shadows
The most obvious method is to sample 4 neighbor texels and interpolate between them (bi-cubic looks even better). We can’t just interpolate the shadow map. We have to interpolate the results of the shadow test, so we’ll use the shadow_hard() function as the base and interpolate from there. I wrote about cubic interpolation here:
Here’s my reduced function for interpolating the shadows:
float shadow_interp(vec4 p, float slope)
{
    //Linear sub-pixel coordinates
    vec2 l = fract(p.xy / p.w * RES * 0.5);
    //Cubic interpolation
    vec2 c = l*l * (3.0 - l*2.0);

    //Texel offsets
    vec3 t = p.w / RES * vec3(-0.5, +0.5, 0);
    //Offset to the nearest texel center
    vec4 o = p.w / RES * vec4(0.5 - l, BIAS*slope, 0);

    //Sample 4 nearest texels
    float s00 = shadow_hard(p + o + t.xxzz);
    float s10 = shadow_hard(p + o + t.yxzz);
    float s01 = shadow_hard(p + o + t.xyzz);
    float s11 = shadow_hard(p + o + t.yyzz);

    //Interpolate between samples (bi-cubic)
    return mix(mix(s00,s10,c.x), mix(s01,s11,c.x), c.y);
}
By factoring in the slope, you can get add bias only when you need it most. I’ll show you how to compute the slope later, but for now you could use 1.0 as a placeholder.
This method is pretty cheap and looks much better, but it still clearly has some choppiness.
My favorite method is to sample several places in disk shape, which can give nice, natural looking shadows
I won’t go in a lot of detail because I don’t want to make this tutorial too long, but the idea here is to start with a random direction (blue noise textures work best). This will be the direction of the sample point, which when we rotate it by the golden angle, we get a nice distribution of the samples. Then we just increase the radius with each sample (use sqrt for even radial distribution). Finally, we just average the results.
Here’s my code:
float shadow_soft(vec4 p, float slope)
{
    //Sum of shadow samples for averaging
    float sum = 0.0;

    //Pick a random starting direction
    vec2 dir = normalize(texture2D(u_noise, gl_FragCoord.xy/64.0).xy - 0.5);
    //Noiseless version
    //vec2 dir = vec2(1,0);

    //Golden angle rotation matrix
    //https://mini.gmshaders.com/i/139108917/golden-angle
    const mat2 ang = mat2(-0.7373688, -0.6754904, 0.6754904,  -0.7373688);

    //Fibonacci disk scale
    float scale = u_radius / RES;

    //Loop through samples in a disk (i approx. ranges from 0 to 1)
    for(float i = 0.5/NUM; i<1.0; i+=1.0/NUM)
    {
        //Rotate sample direction
        dir *= ang;
        //Sample point radius
        float radius = scale * sqrt(i);

        //Add hard shadow sample
        sum += shadow_hard(radius * vec4(dir, BIAS*slope, 0) + p);
    }
    return sum / NUM;
}
You will notice a performance bump if you apply a big blur radius. This is because GPUs are optimized for texture samples being clustered close together. Sampling random, distance points on a texture (especially a large texture) will be more costly.
Fewer samples are better, and you don’t want it softer than you need. It’s worth considering, apply a depth-aware blur to the shadows afterward to keep them smooth with fewer samples. Anyway, you may have noticed that there’s more to the lighting than just shadows. Face shading can give players a greater sense of depth and realism.
Phong Lighting
The Phong Reflection Model is a common lighting model for shading because of its simplicity. You probably know the diffuse bit which is dot(normal, -dir_to_light), usually with an added a max(x, 0.0) to prevent negative values.
In our case, however, we can orientate the normals with the shadow view matrix and then we’ll know that the normal’s -Z direction will always be towards the light.
I’m also going to want the direction from the camera to the world (in shadow-space), so that I can do specular reflections. This is effectively the eye direction, but we’re doing everything in shadow-space for consistency:
gl_Position = gm_Matrices[MATRIX_WORLD_VIEW_PROJECTION] * vec4(in_Position, 1);

//Shortened for convenience
mat4 mat_world = gm_Matrices[MATRIX_WORLD];
mat4 mat_view = gm_Matrices[MATRIX_WORLD_VIEW];

//World space position
vec4 wor = mat_world * vec4(in_Position, 1);
//World space camera position hack
vec3 cam = -mat_view[3].xyz * mat3(mat_view);

//Shadow view coordinates
v_shadow = u_sha_view * wor;
//Normals in shadow-space
v_normal = mat3(u_sha_view) * mat3(mat_world) * in_Normal;
//World, relative to camera, in shadow space
v_eye = mat3(u_sha_view) * (cam - wor.xyz);
//Regular color and texture
v_color = in_Colour;
v_coord = in_TextureCoord;
Back to the frag shader. Since we know that normal’s z is always oriented away from the light, we don’t have to do the dot product, we can simply just use the -normal.z.
We can take a little further by adding some specular highlights. This is done in the same way as the diffuse lighting, but we reflect the eye direction (normalized) vector from the vertex shader off the normal. Again, the z component is already oriented towards the light, so no dot is needed. We can simply raise this to a high power for sharpness and add this to the result of the diffuse lighting.
Everything put together results in something like this. Much better than flat lighting
Here’s the fragment code I used which includes alpha testing, gamma correction, sloping, soft shading and specular highlights
//Discard below the alpha threshold
vec4 col = texture2D(gm_BaseTexture, v_coord);
if (col.a<0.5) discard;

//Factor in vertex color
col *= v_color;
//Convert to linear RGB
col.rgb = pow(col.rgb, vec3(GAMMA));

//Compute shadow-projection-space coordinates
vec4 proj = u_sha_proj * v_shadow;

//Normalize to the -1 to +1 range (accounting for perspective)
vec2 suv = proj.xy/proj.w;
//Edge vignette from shadow uvs
vec2 edge = max(1.0 - suv*suv, 0.0);
//Shade anything outside of the shadow map
float shadow = edge.x * edge.y * float(proj.z>0.0);
//Normalize shadow-space normals
vec3 norm = normalize(v_normal);

//Compute slope with safe limits
float slope = 1.0 / max(-norm.z, 0.1);
//Only do shadow mapping inside the shadow map
if (shadow>0.01) shadow *= shadow_soft(proj, slope);
//Try alternative shadow functions here: shadow_hard(proj), shadow_interp(proj, slope)

//Soft lighting
float lig = 0.5-0.5*norm.z;
//Blend with shadows and some ambient light
lig *= lig * (shadow*0.95 + 0.05);

//Specular reflection
vec3 eye = normalize(v_eye);
float ref = max(reflect(eye, norm).z, 0.0);
float spec = pow(ref, SPEC_EXP) * SPEC_AMOUNT;
//Screen blend specular highlights with
col.rgb = 1.0 - (1.0 - col.rgb*lig) * (1.0 - spec);

//Convert back to sRGB
col.rgb = pow(col.rgb, 1.0/vec3(GAMMA));
The full source code and demo is on GitHub!
Conclusion
Phew, that may have been my longest mini tutorial yet. There was a lot to cover, and I didn’t want to skim over any important details. When you need shadows for your games, this first thing you should try is shadow mapping.
The process begins by drawing the scene from the perspective of the light. All you need is the depth from the light’s point of view. Then when you draw the full scene, you can project this depth map on to your scene and see which areas are behind what the light can see (in shadow). You can’t just compare the real depth with the projected
depth though because there are too many approximations in the depth, but adding even a small bias can mitigate those artifacts.
Filtering shadows to make them soft, is quite similar to filtering or blurring anything else. You just have to do it after you’ve done the shadow casting. Be smart about the number of samples you use, shadow map resolution, and screen resolution. Sometimes a little post-processing to soften them, is your best option.
Shadow mapping is best paired with some Phong Lighting. A little reflectivity can help with depth perception in shadowed areas, or you can look into more advanced lighting models like PBR, ambient occlusion or global illumination.
That’s it for now. I hope that’s enough to get you started on some cool stuff in 3D. I’d love to see what you guys make with this (tweet at me)!
Extras
LearnOpenGL has a solid tutorial on Shadow Mapping from start to finish. If you’re not totally following, this might be the next tutorial to read
Microsoft published a guide on some techniques to further improve shadow mapping.
They also published an introduction to Cascaded Shadow Mapping, which is ideal for large scale scenes and outdoor settings.
That’s it for this week. Take care!


great post! thank you