
Common Shader Mistakes
Avoiding the most common problems in graphics programming

Greetings!
Everyone knows that shaders are super easy to write and to debug, so this should be a quick tutorial. In case it isn’t clear, that was sarcasm. I’ve spent thousands of hours writing shaders, and I’ve gotten quite good at avoiding most of the pitfalls, but even so, I still occasionally get stuck. Today, I’d like to share some advice that could save you dozens of hours and headaches.
Writing For Clarity
The first step is to write cleaner code. It might sound hypocritical coming from me, but you can save a lot of time and headaches later by writing code that others, or future you, can read. Leave comments explaining each part, and name your variables clearly and consistently. This should help you avoid naming conflicts that shorter variable names might lead to (Is “c” short for coordinates or color?). If you copy-paste code from a tutorial, it’s good to practice adding comments line-by-line and make sure you understand each part, if possible.
Try eliminating magic numbers, either with consts, macros, or uniforms. One of the most common issues is a mismatch in uniform names. If you accidentally mistype a uniform name inside or outside the shader, it will default to 0.0 and cause unexpected issues. If your uniforms are broken, check this first!
Colors
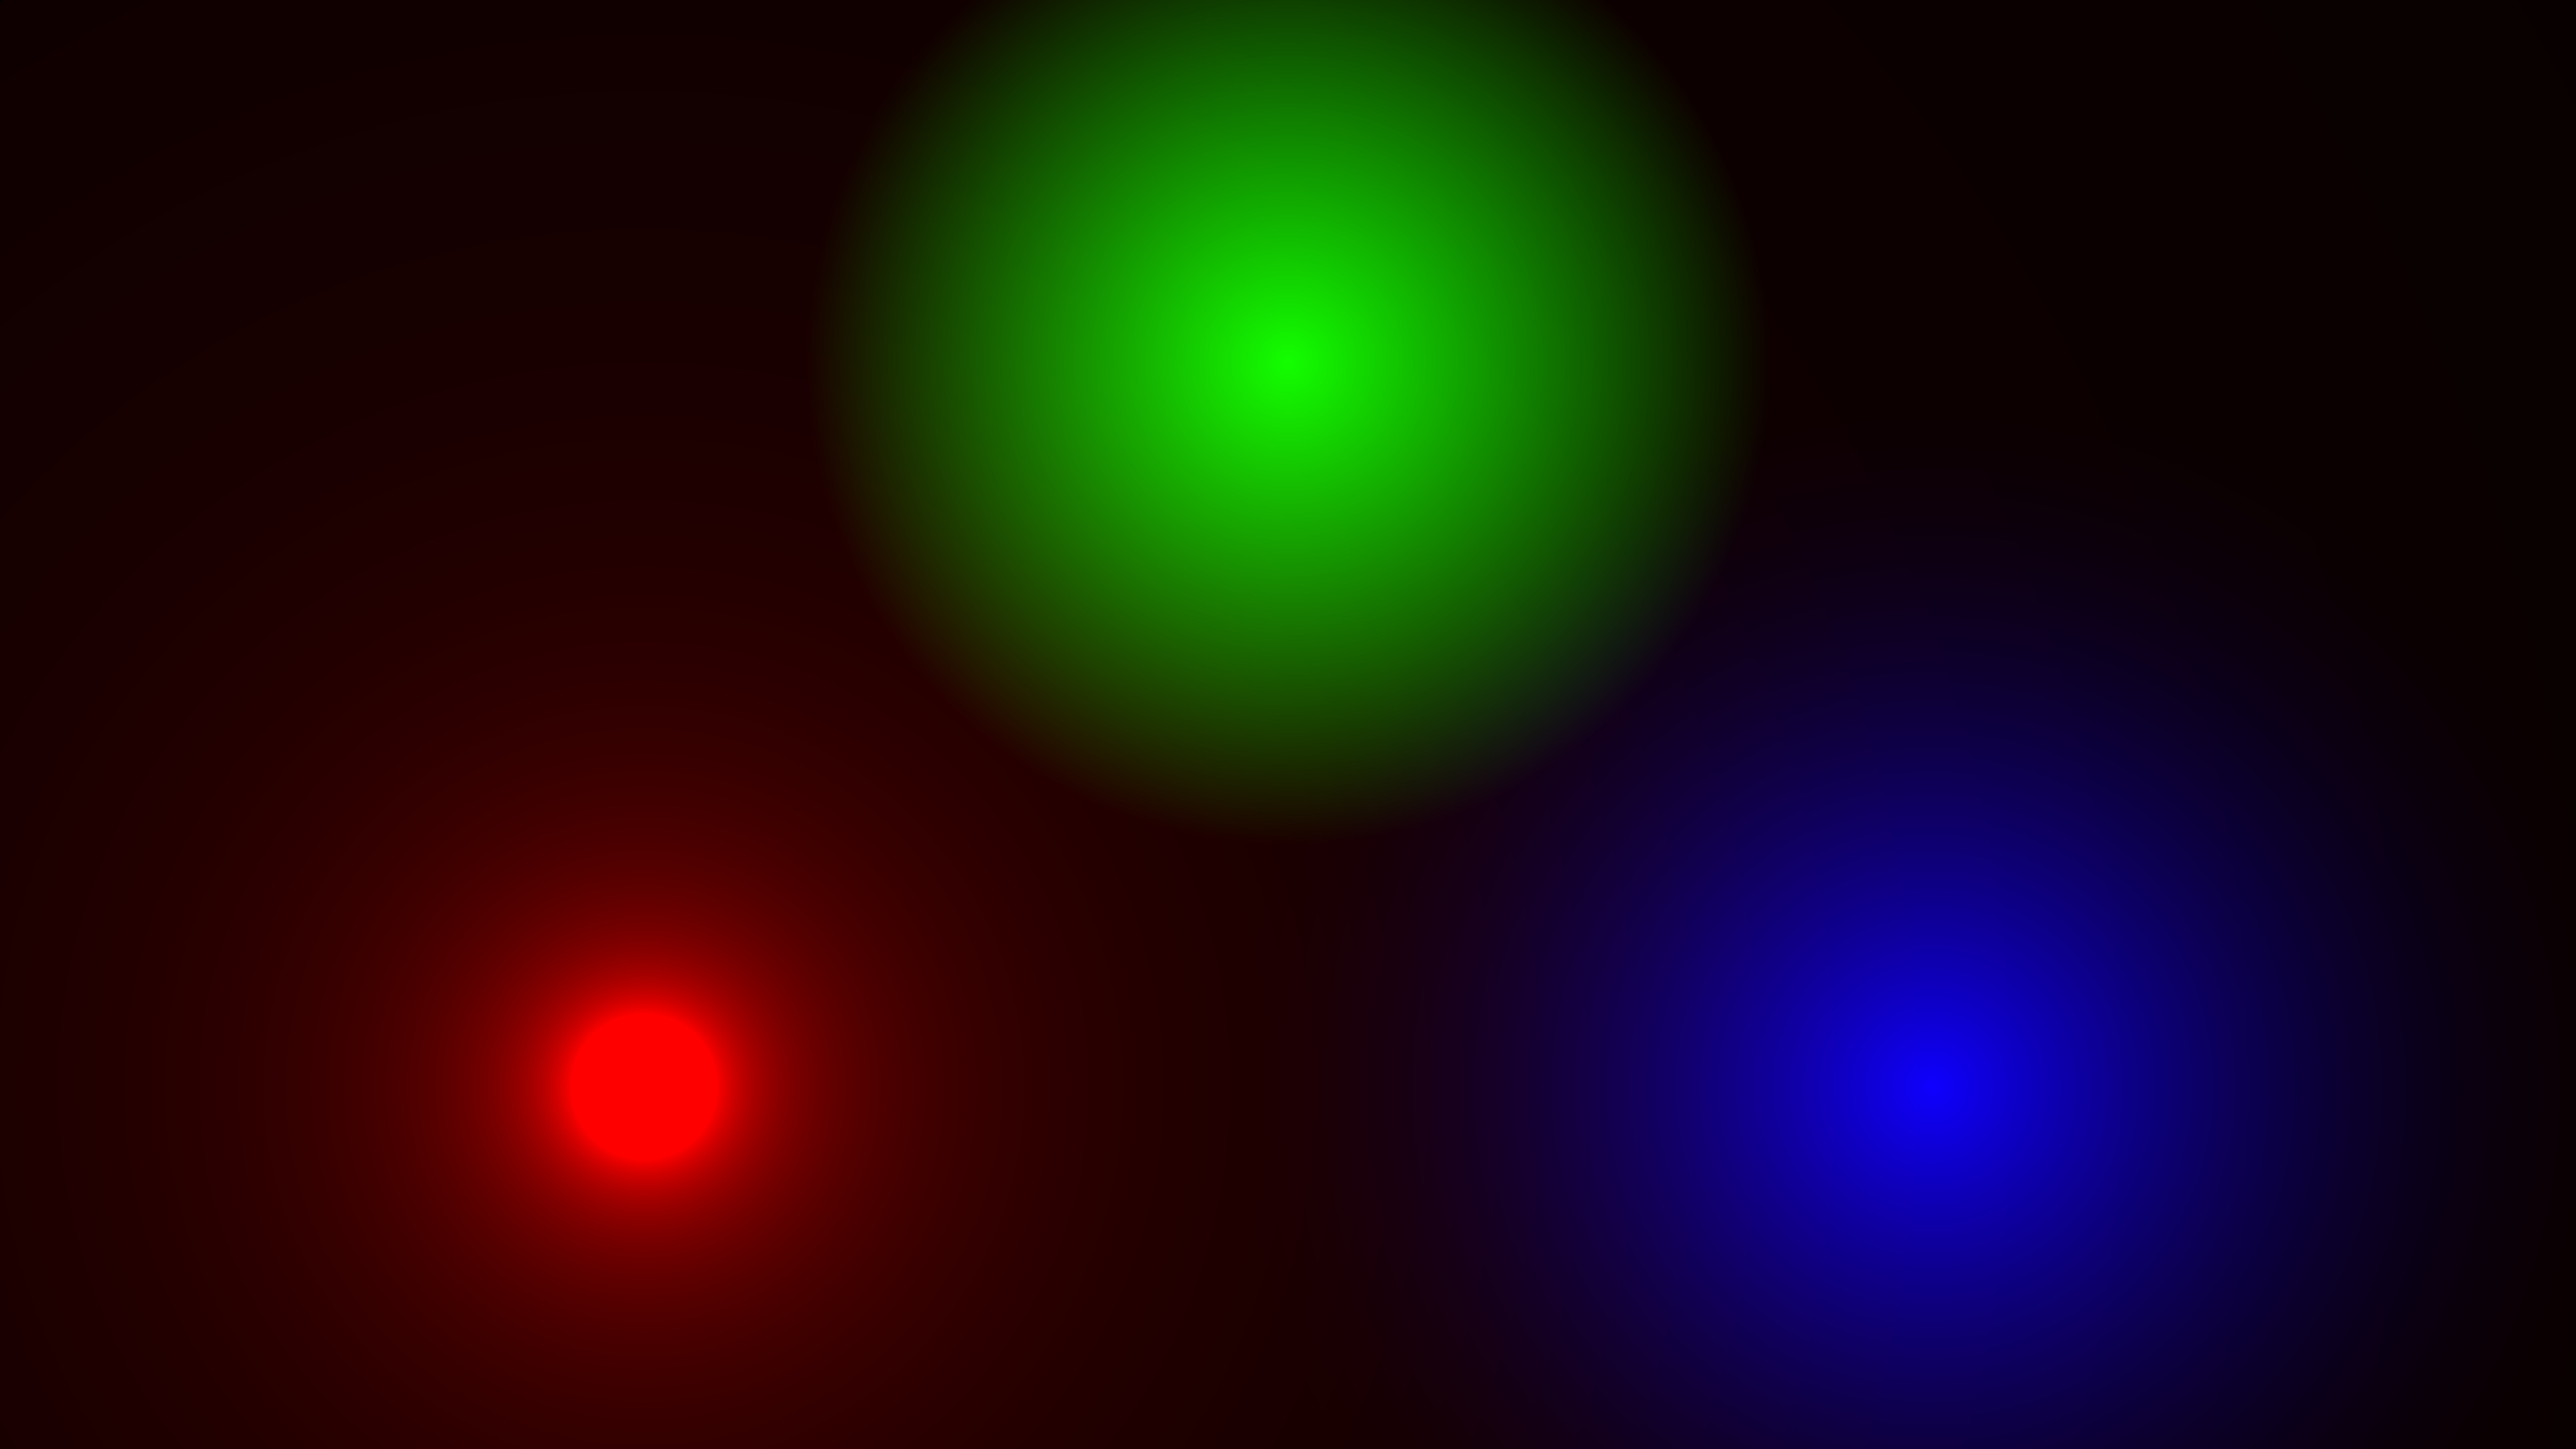
Did the screen go black? Or maybe parts of the screen? Wherever this occurs, look for floats containing undefined, “Not-a-Number” values. Once you have a NaN, it’s very hard to get rid of. Any operation on a non-number will result in a non-number answer and more blank pixels.
 https://t.co/QSZdowWh26\" / X")
This can happen when “x” is negative in sqrt(x), log(x), log2(x) or pow(x, y)1. In such cases, you may need to use max(x, 0.0) or abs(x) to keep x from being negative. Same with inverse functions like “acos(x)” or “asin(x)”. When x is outside the expected range [-1, 1], you’ll get NaNs. It should be clamped in such cases.
Also, look out for dividing by zero. 0.0 / 0.0 will cause a NaN, and you should consider this possibility with any division.
While not game-breaking, you should also make sure you are handling Gamma correction properly. I won’t repeat myself here, but you can read my full write-up on the topic over in this tutorial.
GM Shaders: Gamma

Today, we’re tackling gamma correction inside shaders. Many have written about gamma correction, but I haven’t found any that satisfy my teaching goals, so I thought I’d write my own quick overview.
When doing lighting, you should choose the right lighting falloff function, and while this may depend on the style, the inverse of the square distance is physically correct.
However, regardless of the falloff function, you may see some banding artifacts, which can compound, especially with Low-Dynamic-Range additive lights. This is where dithering can help!
Textures
When it comes to textures, there are a lot of things that can go wrong. Texture page issues, coordinate issues, texture sizes, mipmap artifacts, and more.
To start, make sure that you understand how sprite drawing works. In a game engine like GameMaker, multiple sprites are put together on one texture called a “texture page” and when you draw a sprite, you’re just drawing part of a texture:

When you draw a sprite, it is actually just drawing a quad of part of the texture page. Texture coordinates range from 0 to 1 across the entire texture page, but individual sprites will only span part of the texture page:
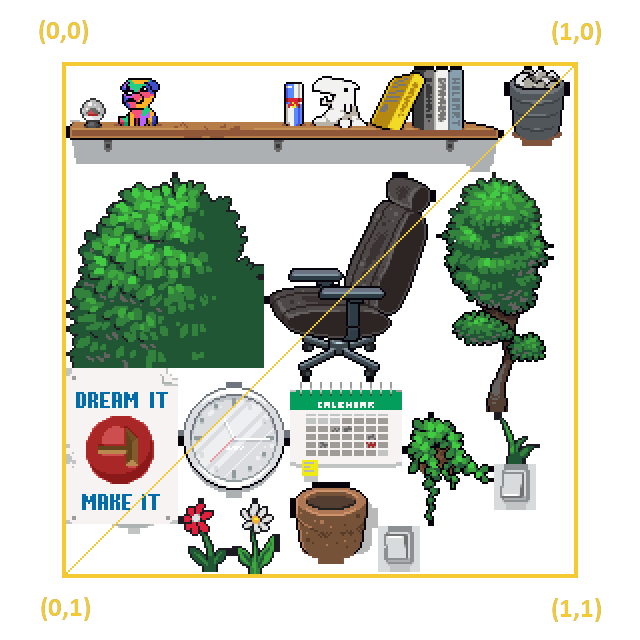
Some shaders are written assuming the texture coordinates will always range from 0 to 1. This may be the case if you specifically put the texture on its own texture page and the texture is not being padded. Some devices do not support non-power-of-two sizes, though, and will add padding around the texture, which may cause unexpected issues on those devices.
//Remap textures coordinates to [0, 1] range
vec2 texcoord_normalize(vec2 coord, vec4 uvs)
{
     return (coord - uvs.xy) / uvs.zw;
}

//Remap textures from the [0, 1] range
vec2 texcoord_unnormalize(vec2 coord, vec4 uvs)
{
     return coord * uvs.zw + uvs.xy;
}
I wrote more about how to manage texture pages here! If you have issues with flipped textures or clamping/repeating textures, you should read that.
When it comes to texture interpolation, the standard texture function interpolates at a resolution of 256. Meaning, interpolated textures only blend in 256 steps, which is enough for most cases, but may not be enough if you need to scale a texture up a lot.
If you enable mipmapping, you may notice 2x2 blocks of artifacts:

This is because mipmaps are computed in 2x2 chunks. If there are sharp changes in the texture coordinates within a 2x2 chunk, it will use a lower LOD. You can address this by either disabling mipmapping, removing the discontinuities and sharp changes in the coordinates, or calculating the mipmap level manually. In GLSL 1.30 or later, you can use textureGrad() and compute the derivatives manually to get around this.
Coordinates
Handling scaling, aspect ratio, and centering at any resolution can be challenging. I wrote specifically about managing this, here:
GM Shaders Mini: Scaling

If ever tried to center your shader without stretching, you’ve probably seen these configurations. My goal for tonight is to go over a few common scaling arrangements so that you can understand them once and for all!,
When it comes to 3D, you often have to convert between different coordinate systems, like model-space, world-space, and screenspace. In 2D, we still sometimes have to convert between texture space, world-space, and screenspace.
This is not something that is super easy to summarize, but if you have issues with coordinate conversions, I wrote about this here:
GM Shaders Mini: Vector Spaces

Hi friends. Maybe you’ve heard terms like “view space”, “model space” or “screen space”, but you’re not sure what it all means exactly? This is what we’ll be exploring today. For our purposes, “spaces” can be thought of as coordinate systems, which can be rotated, translated, scaled and skewed. We’ll go over the most important vector spaces, what they’r…
Precision
Floats actually vary in quality depending on the device and hardware. Mobile devices often default to a lower precision, while desktops may use higher precision.

Lower precisions reduce the range of values and the decimal precision. A shader might work well on your desktop, but have poor quality on your phone. You can set the precision higher, but it may run slower on those devices, so it’s best to use the lowest quality you can get away with. lowp works well for colors, mediump for texture coordinates, and highp for positional coordinates.
When generating noise procedurally, you’re likely to notice a big loss in quality at lower precisions, so it’s best to use high precision for that.

With animated shaders, you may run into precision issues with your time variable:

Anytime you are working with a time variable, you should anticipate it becoming larger and larger. You can try multiplying the time factor by, like 1000, to see if your shader will work over time. If not, the easiest solution is just to loop the time variable every 600 or so seconds. There are several other approaches, though and I might have to do a separate tutorial on it sometime.
And finally, when it comes to sharp, pixelated edges, there’s no excuse not to implement some anti-aliasing:
GM Shaders: Anti-Aliasing

Today’s tutorial is about “analytic anti-aliasing”. Anti-aliasing is all about producing soft, natural-looking edges in your shaders.
Conclusion
To recap, let’s summarize everything we’ve covered today:
Clarity:
Rename variables for clarity
Write comments to explain each part of the code. Future you will thank you
Double-check uniform names inside and out of shaders
Color:
Make sure negative sqrts and logs are impossible.
Prevent zero divided by zero!
Clamp inverse trig functions as needed.
Do color operations in decoded-gamma (linear-color) and reencode to sRGB.
Optional: Dither to mask banding artifacts
Textures:
Don't assume normalized 0 to 1 texture coordinates.
Avoid hardware texture interpolation for highly-stretched textures.
When mipmapping, avoid sudden changes (discontinuities) in texture coordinates.
Coordinates:
Make sure your shader works as intended at a variety of resolutions and aspect ratios.
Know what coordinate system to use for the job and how to convert between them when needed.
Precision:
Use
highpfloats when needed to avoid precision artifacts on low-end devices.Use
lowpormediumpwhen possible to improve performance on low-end devices.Generally, you should generate procedural noise in
highp.Keep your time uniforms in a reasonable range and test your game at high speed.
Implement anti-aliasing whenever you can!
If you take these steps, hopefully, you save yourself a lot of time and prevent several problems before they happen. Believe me, I’ve spent a lot of time wrestling with some of these issues personally and I imagine others have as well. I’d suggest bookmarking this page for later, so if you ever run into an issue, you can check this list first. If you find something I missed, don’t hesitate to reach out! Thank you!
Extras
RenderDoc is a well-known shader debugging tool, and for my GameMaker readers, there is a nice script for using this with GM here.
SHADERed is a neat offline tool for editing, debugging, and profiling shaders in a variety of languages.
That’s all for now, thanks for reading! Have a great day!
-Xor
You’ll also get NaN errors in pow(x, y) when x = 0.0 and y <= 0.0!
So to avoid issues with Time doing weird things when very large, do you just modulo the actual time value to an acceptable value like 600?